The Ultimate Guide To Blogger Blogs

Place Two Ads Side By Side In Blogger

Place Two Ads Side By Side In Blogger


Placing your Adsense Ads in the right spots is very important to get a good CTR(Click Through Rate). This doesn't mean that you can place your Ads wherever you want in a page and expect a good revenue. Doing this not only makes your blog look untidy, but also increases your bounce rate because people do not want to read through your blog which is filled with Adsense rather than quality content. So placing your ads in the right place is very much important. One of those good spots is placing two rectangular ads beside each other in your posts like I have placed in this post.

     It is quite easy to place two ads side by side and doesn't require any technical knowledge. Just copy the below code and paste it in your HTML editor of individual posts.

 <table><tr><td>
FIRST AD CODE HERE!!!
</td><td>
SECOND AD CODE HERE!!!
</td></tr></table>

Just replace the "FIRST AD CODE HERE" and "SECOND AD CODE HERE" with your adsense codes and paste them in your HTML editor in your blogger posts.

Place Two Ads Side By Side In Blogger

If you have done everything successfully, then you should be able to see your ads between your post. Doing this does not violate Google's Adsense Policies. Remember that sometimes Adsense Ads can take time to activate.

Using this code, you can even place an Ad just beside an image like this


I have used this code in a post about permalinks and it came out pretty well. All you have to do is replace the second Ad code with the image link and details which will look something like this


Don't forget to include all the image properties like border, margin and alignment for better placement.

If you have done everything correctly, then you should be able to see two ads beside each other or an Ad beside an image.

If you have anything to say, please put them in the comments below.

Also Read: Add Social Media Buttons To Blog Posts.

Add Social Media Buttons In Blogger Blogs

add social media buttons in blogger

It is very important to reach out to your audience in every way possible to attract good traffic to your blog. There are many ways to reach out to your audience and one among them is to make your audience share your posts as soon as they have finished reading your article. So adding social media buttons at the end of every post is quite beneficial to reach your audience. Follow the steps below to add cool social media buttons at the end of every post in your blogger blogs.

NOTE: Before doing any changes to your code, It is recommended that you back up the whole Template just in case anything goes wrong.

Adding Social Media Buttons


  • In your Blogger dashboard Goto Template-->Edit HTML.
  • In the code area, press CTRL+F to open the search box. Type ]]></b:skin> and press Enter.
  • Just above the ]]></b:skin> paste the code shown below.


                   .share_button { 
                   width: 300px;


                   height: 50px; 
                   margin: 10px auto; 
                    }
                 .share_button ul { 
                  width: 50%; 
                  height: inherit; 
                  float: left; 
                  list-style: none; 
                  margin: 0 !important; 
                  padding: 0 !important; 
                  }
                 .share_button ul h1 { 
                 margin-top: 9%; 
                 overflow: hidden; 
                 width: 100%;
                 color: #4889F0; 
                 font-size: 18px; 
                 text-shadow:2px 2px 2px #fff; 
                 }
                .share_button ul li { 
                position: absolute; 
                height: inherit;  
                width: 150px; 
                margin: 0 !important; 
                padding: 0 !important; 
                background: #EEEEEE;
               -webkit-transition: all 600ms;
               -moz-transition: all 600ms;
               -o-transition: all 600ms;
               -ms-transition: all 600ms;
               transition: all 600ms;
               text-align: center;
               }
              .share_button ul li h2 { 
              display: inline-block; 
              width: 32%; 
              height: 40px; 
              overflow: hidden; 
              margin-top: 5%; 
              cursor: pointer; 
              border: 0 !important; 
              }
             .share_button ul:first-child li:first-child{
             text-align: right; 
              }
            .share_button ul:last-child li:first-child{
            text-align: left; 
            }
             .share_button ul:first-child li:last-child,
              .share_button:hover ul:first-child li:first-child {
             -webkit-transform: rotateY(90deg);
            -moz-transform: rotateY(90deg);
            -o-transform: rotateY(90deg);
          -ms-transform: rotateY(90deg);
          transform: rotateY(90deg);
           }
            .share_button ul:last-child li:last-child,
           .share_button:hover ul:last-child li:first-child {
         -webkit-transform: rotateY(-90deg);
          -moz-transform: rotateY(-90deg);
        -o-transform: rotateY(-90deg);
        -ms-transform: rotateY(-90deg);
         transform: rotateY(-90deg);  
         }
       .share_button:hover ul:first-child li:last-child,
      .share_button:hover ul:last-child li:last-child {
      -webkit-transform: rotateY(0deg);
      -moz-transform: rotateY(0deg);
       -o-transform: rotateY(0deg);
      -ms-transform: rotateY(0deg);
      transform: rotateY(0deg); 
       }


  • Now that we have pasted the CSS code, we need to now place the HTML code. For this search for
                         <div class='post-footer'> 

  • Place the following code just above the above code.
 <div class='share_button'>
<ul>
<li><h1>
Share It
</h1></li>
<li><h2>
<a expr:href='&quot;http://www.facebook.com/sharer.php?u=&quot; + data:post.canonicalUrl + &quot;&amp;t=&quot; + data:post.title ' title='Share on Facebook'><img src="https://blogger.googleusercontent.com/img/b/R29vZ2xl/AVvXsEjZH9Fohw-ifEul2rPzqOqbbViYE9HaIVbS8iBE58uY99AgjgJvfQ6UWrEBSm0yrUATSTYcuyv2T_pmO5KzcK1zB5HE6kr7MS7VBg3e82L7oisEvwdotIUbQx1szfd3xjzYPTOtR70FDZHA/s1600/Facebook.png"/></a></h2>

<h2><a expr:href='&quot;http://twitter.com/home?status=&quot; + data:post.title + &quot; &quot; + data:post.canonicalUrl ' title='Share on Twitter'><img src="https://blogger.googleusercontent.com/img/b/R29vZ2xl/AVvXsEiwJrpt1X4TCzswS149y1CeebdiwnTXMjHV3R5B2BcRvc0HLkquylq0rRSBOj2csjZ-txYZrpT4j8F70ZutotZT09qjBnxIaZA1ySzapH0g86rIj_1TITXTWxlX_CTUDr-_gG-HCoMg98Ui/s1600/Twitter.png"/></a></h2>
</li>
</ul>
<ul>
<li><h1>his page</h1></li>

<li>
<h2><a expr:href='&quot;https://plus.google.com/share?url=&quot; + data:post.canonicalUrl ' title='Share on Google Plus'><img src="https://blogger.googleusercontent.com/img/b/R29vZ2xl/AVvXsEjHBqfYZ0GI5f5xRFJVDt1fbiFXZYBxB9zi6I_6oqd7utqNi31o_QI85aLmC_Va7uncgM220EW_xpKyWMOMmAj4QqcL18ISmZAGSO4FfrgBXfYg9tpPjx3V5kdVIsGYCtuzvfvJ57_-YYZu/s1600/Google-plus.png"/></a></h2>

<h2>
<a href='javascript:void((function(){var%20e=document.createElement(&apos;script&apos;);e.setAttribute(&apos;type&apos;,&apos;text/javascript&apos;);e.setAttribute(&apos;charset&apos;,&apos;UTF-8&apos;);e.setAttribute(&apos;src&apos;,&apos;http://assets.pinterest.com/js/pinmarklet.js?r=&apos;+Math.random()*99999999);document.body.appendChild(e)})());' title='Share on Pinterest'><img src="https://blogger.googleusercontent.com/img/b/R29vZ2xl/AVvXsEh_LMgnWUTl_e26xvvXLDojBZ5wPDRPOaCj5jiqKsuHmgNdHmjj6splC5BhaF_W2M4DvVtADB9RKBRb-OzxSfTlX2xaYKT-GlF4U0GqN2EBNkGyVY8QC2w-DTpbfmfYbCjBrfgZoQ2L1RGD/s1600/Pinterest.png"/></a>
</h2>
</li>
</ul>
</div>


  • After you have done everything, Save your template and should be seeing your Social media buttons at the end of every post.
If you have anything to say, please put them in the comments below.

Blogger Custom Domain- Set Up Guide

custom domain for blogger


The One thing that I love about blogger blogs apart from the fact that it is free, is the option to set up a custom domain to your blog. Setting up a custom domain gives us that extra edge that we have always been longing for.  It is actually quite easy to set up a custom domain and you do not need to panic about the tweaks you need to apply in your domain's home page.

    Follow this guide if you need to set a blogger custom domain.

Blogger Custom Domain


  • Well, the first thing you need to do is to register your domain though any of the domain partners. There are many vendors out there but  I strongly recommend Godaddy because of it's simple interface which is lot a less confusing than any other partners out there.
custom domain for blogger
  • Now that you have registered your domain which looks something like www.yourdomain.com, login to your registered account probably Godaddy or in whichever domain partner you have registered with.
  • In your account search for DNS file editor and click on it. Some sites have it like DNS Settings. Here we need to create entries that point to your hosting account (Here your hosting account is blogger).

custom domain for blogger

  • Now we need to create two kinds of entries- A(host) records and CNAME records.
  • First select "Add New Record" and select CNAME records. For the CNAME records login to your blogger dashboard and click on Settings. 
  • In that Go to Basic settings and select set-up third party URL. Here enter the full URL of the domain you have registered.
custom domain for blogger
  • Here you will be getting a pair of host names and their destinations or values. These are the values you need to add in your domain account.

custom domain for blogger
  • Add these values in the CNAME records section.
  • After you add these, again select Add New Record and click on A (Host) records. In this category you need to provide @ in the Host section and in the Enter values field, enter the values given below.
                                                   
                                                  212.239.32.21
                                                 212.239.34.21
                                                212.239.36.21
                                               212.239.38.21 
  •  These are  Google's IP addresses and these are used when a user enters your URL without the www. 
  • Now save all the changes in your domain dashboard as well as your blogger dashboard. Make sure to check redirect youdomain.com to www.yourdomain.com. This will redirect your visitor when he enters the non www version of your site.
  • Now you have successfully set up a custom domain or URL to your blogger blog. Remember that it might take up to 48 hours for the setings to take effect. So please be patient.
After 48 hours, your will can be successfully accessed using your custom URL. If you have anything to say, please put them in the comments below. 

How To Add Facebook Widget To Your Blog


Add facebook widget to your blog

Do you know that Facebook can attract a lot of organic traffic to your site? Promoting your blog through facebook is one of the easiest ways to bring lots of traffic to your blog. Even visitors visiting your blog can share your page directly from your blog. So adding a facebook widget indirectly brings good organic traffic to your blog. In this post I am going to show you to add a facebook widget to your blog. Well there are many articles out there but most of them are outdated. So follow this tutorial if you want to know the latest method to add a facebook widget to your blog.


facebook widget for blogger

  • Then enter the width and height details you want. If you are not sure then tick the "Adapt to plugin container width". After that click on "Get Code."
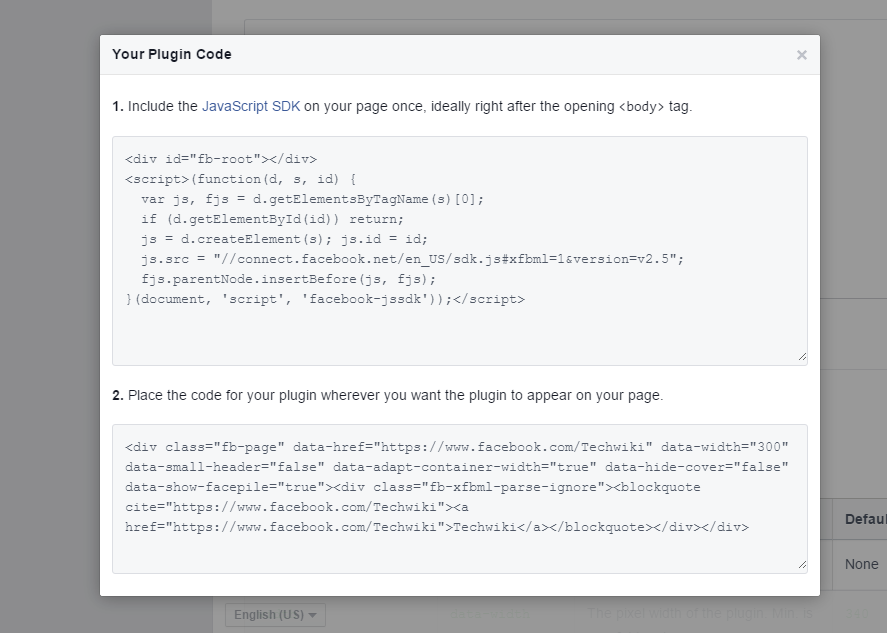
  • Now you will be getting a dialog box with the code.
facebook widget for blogger

  • If you paste the JavaScript code, you will be getting a parsing error which says it has problems with the delimiter. So copy and paste the below code instead of the JavaScript code shown in the above screen shot.
                                <div id="fb-root"></div>
                                 <script>
                              /* <![CDATA[ */
                                (function(d, s, id) {
                            var js, fjs = d.getElementsByTagName(s)[0];
                          if (d.getElementById(id)) return;
                             js = d.createElement(s); js.id = id;
                           js.src = "//connect.facebook.net/en_US/sdk.js#xfbml=1&version=v2.3";
                             fjs.parentNode.insertBefore(js, fjs);
                           }(document, 'script', 'facebook-jssdk'));
                            /* ]]> */
                            </script>

  • Paste the above code along with the CSS code provided.
  • Remember that the CSS code has to be pasted in the layout section-->Add Widget-->HTML/JavaScript.
  • After you have done everything correctly, you should see the widget in the area where you have pasted.
If you find any difficulty in adding the widget, then put them in the comments below.


How To Add a Sitemap Link To Your Blog Menu

add sitemap page to blog menu

In this post, I'm going to show you how to add a sitemap file link to your blogger blog. Adding a sitemap to a blog is a great strategy to enhance your website rankings as well as your site traffic. First in order to link a sitemap you need to first create one. After the sitemap is created and submitted to the search engines, you can add this file and link it your blog menu. To do this

  • Login to your blogger dashboard and click on Template and click Edit HTML.
  • In the HTML code, find these lines of code that represents the menu elements in your blog.

  • Follow the same syntax as shown in the image above. If you want more detail on creating menus in blogger, you can refer this post.
If you have followed all the steps correctly, then your xml file looks like this

If you have anything to say or want to give any corrections, please put them in the comment section below.

How To Add Disclaimer and Privacy Policy Pages in Blogger Blogs

Add disclaimer and privacy policy to blogger

We might have gone through many blogs and websites in our day to day internet activities. Some of them look more professional and genuine to browse through and some other websites look a bit informal and creepy. Okay...coming on to the topic, blogs or websites which have a Disclaimer and Privacy Policy in their footer or header menus tend to look more professional in their approach and also give a neat look to the website. Also this will increase your chances of adsense approval. So in this article, I'm going to show you how to create a Disclaimer and Privacy Policy pages for blogger blogs.

Creating Disclaimer and Privacy Policy Pages in Blogger

  • Go to your blogger Dashboard and click on Pages -> New Page.
  • Give the Title to the page as Disclaimer or Privacy Policy and type the message you want to show in the respective pages.
  • Then click on Publish.

Linking The Pages


  • Now that the pages are created, we have to link them to the menu items.
  • For this go to Template -> Edit HTML.
  • In that, search for the code where you have created the menu tags.
  • They should look similar to the image below


  • Just replace the URL with the address of your blog with the extension which may look similar to the below format
                                          /p/disclaimer.html
                                         /p/privacy-policy.html
  • If the above format does not work, in the page editor where you have created the Disclaimer and Privacy Policy, click on View.
  • You will be getting the link to the page. Simply copy the link and paste it in your template code.
That's it. Your Disclaimer and Privacy Policy pages are now created.

If you have anything to say, please put them in the comment section below.

What is a Favicon image and how to customize it for your blog or website

Add favicon image to blogger blog

This little tutorial is for all the newbie bloggers out there wondering about what is a favicon image and how to customize it according to our requirement and design.

A Favicon is a small image or icon which can be found beside the title of a website or a blog. This tiny icon may not look that important to look out for while designing a website but it surely gives a pinch of professionalism and that perfect look you have always been longing for in your blog.

So, customizing your favicon image is quite easy.In this tutorial I am gonna concentrate on changing the favicon icon for a blogger blog, but in my coming tutorials, I will show you how to change them in other blogging platforms.First sign in to your blogger dashboard and goto layout. In that you will be getting a basic layout of your blog. Then click on edit on the Favicon layout box. A new window will be opened where you can upload an image as your favicon. If you do not have any icons on your computer you can download them for free by browsing for them in any of the search engines like google. After downloading your favorite icon you can upload them to the favicon widget and your blog now looks less like a part time blog and more like a profesional blog..!!!

Cheers..!!! 

How to generate a sitemap for your blog or website and submit it to webmaster tools


Linking Posts To Pages in blogger

When I was a newbie in blogging, I found it difficult to understand the various terminologies involved in blogging. But in the later stages I found that blogging is one of the simplest things to do with your computer in your free time.

How To Create Sub menus in Blogger Blogs

Now a days, there are many premium blogger templates available around the internet. One can easily search and download and apply them to their blogger blog.

But the main problem arises when we find  default menus in the blogger templates which are no where related to our blog...

So, How do we customise them according to our content...?

Well....the answer is simple...
This tutorial shows how to create customized menus in blogger templates through HTML Editing..

For This, first click on Template from the menu, and then click on Edit Html...


Resubmitting Your Blog For Google AdSense


One of the main income for a passionate Blogger is from Google AdSense.From my Experience What I observe is that most of the bloggers apply for adsense as soon as they create a blog.Since AdSense is a huge Project by Google, only those blogs are certified which have good traffic and quality, original content.

       It could be a heart break for those rejected by AdSense, but don't worry...there is still hope...

Below i'm gonna show you how to resubmit your AdSense application....

First, On your Blogger Home Screen, Click on Earnings.Here Click on View Dashboard.